Published by November 13, 2025 · Reading time 17 minutes · Created by Lix.so
Yes, you absolutely can post to Instagram from your desktop. The days when Instagram was strictly a mobile-only affair are long gone, making it a whole lot easier for social media managers and creators to handle everything from a computer.
If you've ever found yourself emailing photos from your computer to your phone just to upload them, you already know the answer. Posting directly from your desktop is a massive game-changer, especially for anyone who prefers a proper keyboard and a big screen for editing and writing captions.
It completely cuts out that clumsy transfer process, which not only saves time but also protects the original quality of your high-resolution photos and videos.
But the perks go beyond just convenience:
While Instagram started as a mobile-first app, its web version has become a powerhouse. It's now one of the most visited websites on the planet, which tells you a lot of people are using it from their computers. If you're curious, you can learn more about Instagram's growing desktop user base and what it means for social strategy.
Not sure which method is right for you? This decision tree breaks down the best approach based on what you're trying to do—whether it's a quick one-off post, scheduling a whole week's worth of content, or just needing to see how things look on a mobile screen.
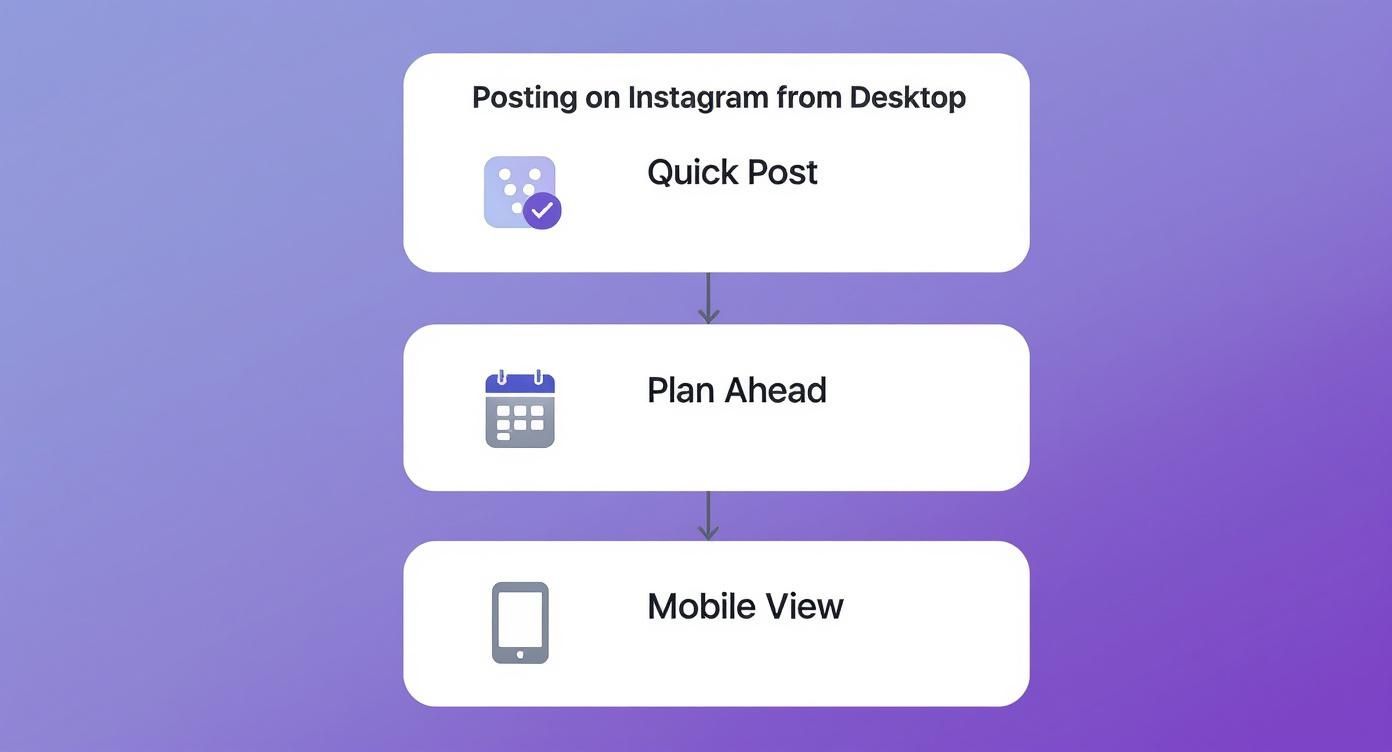
This little guide is perfect for picking the right desktop posting strategy without overthinking it.
To give you a clearer picture, I've put together a quick comparison of the main ways you can post from your computer. Each has its own strengths depending on what you need to get done.
| Method | Best For | Supported Posts | Ease of Use |
|---|---|---|---|
| Instagram.com | Quick, simple posts of single photos or videos | Single photo/video, carousels | Very Easy |
| Meta Business Suite | Scheduling content for Instagram & Facebook | All post types, including Stories & Reels | Moderate |
| Scheduling Tools | Managing multiple accounts and planning content | All post types, advanced analytics | Easy to Moderate |
| Browser "Trick" | Quick Story or Reel uploads when other tools fail | Stories, Reels, basic posts | A bit clunky |
This table should help you quickly pinpoint the best tool for the job. For most professional use cases, Meta Business Suite or a dedicated scheduling platform is going to be your best bet for a streamlined workflow.
For those moments when you just need to get a post live now, heading straight to the official Instagram website is your best bet. It’s quick, it’s clean, and honestly, it’s the most direct way to do it.
Ever since Instagram added the desktop uploader back in late 2021, the days of clunky browser tricks and workarounds for simple posts are long gone. This method is perfect when you’ve got a finished photo or video sitting on your computer and don’t need all the extra features of a scheduling platform.
The whole process feels incredibly familiar because it’s designed to mirror the mobile app. Just log in at instagram.com, and you'll spot the "Create" button—the one with the plus icon—in the menu on the left.
Clicking it pops open a window where you can drag and drop your files right from your desktop. This is a lifesaver for getting those high-res photos you just exported from Lightroom or a quick video edit from Premiere Pro onto your feed without losing quality.
Once your file is in, Instagram walks you through the essentials. First up is cropping. You can adjust the aspect ratio to make sure your content looks exactly as you intended. It gives you the standard presets like 1:1 (square), 4:5 (portrait), and 16:9 (landscape), so nothing gets awkwardly cut off.
You also get a chance to add filters and make some basic tweaks to things like brightness and contrast, though the editing suite is definitely more streamlined than what you find on your phone.
The real win here is efficiency. Typing out a thoughtful caption, adding a location, and tagging other accounts is just so much faster and more accurate with a real keyboard.
From there, you’ll write your caption and add up to 30 hashtags. The last step before you go live is adding alt text to make your post accessible for visually impaired users. Then, just hit "Share."
This is a screenshot from the official Instagram website, showing the clean interface where you'll find the 'Create' button.
As you can see, the layout is simple and user-friendly, making it easy for anyone to get started.
Now, you can't post Stories or create Reels with trending audio this way. But for getting your everyday feed content—photos and standard videos—published from your desktop, the direct upload on instagram.com is the simplest and best answer.
If you're managing any kind of business presence online, you know that posting on the fly just doesn't cut it long-term. This is exactly where Meta Business Suite comes in, and it completely changes the game for how you post on Instagram from a desktop. It’s a free, surprisingly robust platform that lets creators and businesses wrangle both their Instagram and Facebook pages from one spot.

Think about it: what if you could plan out and schedule an entire week’s worth of content in just a couple of hours? That’s the real magic of the Business Suite. You can schedule everything from feed posts to Stories and Reels for exact dates and times, making sure your brand stays active even when you're not. This proactive approach is a huge step up from the reactive nature of posting from your phone.
To get rolling, you’ll first need to link your Instagram business or creator account to a Facebook Page. It’s a quick process, and once they're connected, just head over to the "Planner" or "Content" section. This is your command center, giving you a calendar view of everything you've scheduled and published.
From there, creating a post is pretty intuitive:
One of the slickest features is the preview function. It shows you exactly how your content will look on both Instagram and Facebook before it goes live. This is a lifesaver for keeping your brand looking sharp and consistent, even if you tweak the message for each audience. Plus, the suite gives you access to detailed analytics so you can actually see what's working and adjust your strategy.
By scheduling your content ahead of time, you eliminate that daily "what should I post?" panic. It frees you up to create more thoughtful, strategic content that tells a cohesive brand story.
The platform is designed to support the 350 million business accounts on Instagram, a massive number that underscores just how critical desktop workflows are for serious social media management. Many of these users depend on tools like this for efficiency and planning, as highlighted in recent Instagram business trends at SQ Magazine.
At the end of the day, Meta Business Suite is Meta's official, powerful answer for anyone needing more control than the basic website uploader can offer. If you want to build a professional, consistent Instagram presence from your desktop, this is an indispensable tool. And if you're also diving into paid advertising, understanding the best Facebook ads management tools available will help round out your entire strategy.
Sometimes, you just need to get a quick photo or Story up without firing up a full-blown social media manager. For those moments, there's a classic workaround that lets you post to Instagram from a desktop by essentially tricking your browser into thinking it's a phone.
This clever little hack uses your browser’s built-in developer tools to reveal the mobile interface—complete with the familiar “+” upload button that's normally missing on the desktop site.
I’ve found this technique to be a lifesaver when I need to make a quick, on-the-fly post and don't want to mess with scheduling tools. While it’s not built for scheduling content or crafting complex Reels, it’s perfect for getting simple posts live in a pinch. The process is a little different depending on your browser, but the core idea is exactly the same.
Getting this to work is surprisingly simple. You don’t need any special software—just the browser you’re already using. Here’s a quick rundown for the most popular options.
For Chrome & Firefox: Right-click anywhere on the Instagram page and choose "Inspect" or "Inspect Element." A new panel will pop open. Look for an icon that looks like a small tablet and phone next to each other (it's often called the "Toggle Device Toolbar") and click it. Just refresh the page, and the mobile view should appear.
For Safari: First, you’ll need to enable the developer menu. Go to Safari > Settings > Advanced and check the box that says "Show features for web developers." With that done, head over to Instagram, click "Develop" in the top menu bar, and select "Enter Responsive Design Mode."
Once you’re in mobile view, the Instagram website will behave almost exactly like the mobile app. You'll see the navigation bar at the bottom, letting you tap the "+" icon, select a photo or video from your computer, write your caption, and post directly to your feed or Story.
Think of it as a lightweight, mobile-like experience right on your desktop. It’s a fantastic backup option that ensures you can always get your content uploaded, no matter what.
Uploading from a computer gives you a ton of control over your media, but it's easy to lose that quality advantage if your files aren't formatted just right. When you post on Instagram from a desktop, getting the technical specs dialed in beforehand is the secret to avoiding blurry photos and pixelated videos.
Instagram's compression can be pretty aggressive. If you upload a file that’s too large or in the wrong format, the platform will automatically shrink it down, and you’ll almost always see a drop in quality. Sticking to the recommended settings is like giving Instagram a gentle nudge to handle your media with care.
To make sure your content looks just as sharp on the feed as it did on your monitor, prep your files with these guidelines. Think of them less as strict rules and more as a recipe for success.
Paying attention to these technical details is hands-down the most effective way to keep your media looking crisp. It’s the difference between a post that looks professional and one that looks like it’s been screenshotted and re-uploaded a few times.
The final piece of the puzzle is the aspect ratio. Getting this right from the start prevents Instagram from awkwardly cropping your perfectly composed shot.
For example, a vertical 4:5 ratio is perfect for feed posts—it takes up way more screen real estate than a standard square (1:1) or a wide landscape (16:9) photo. For Reels and Stories, you’ll always want to use a full-screen vertical 9:16 ratio. These dimensions aren't just for Instagram, either; they're a key part of creating consistent visuals everywhere. You can dive deeper into standardizing your creative assets with this handy guide on display ad sizes.
To make it even easier, here's a quick-reference table with all the key specs in one place.
This table breaks down the essential technical specs for different Instagram content types. Use it as a checklist before you upload from your desktop to ensure everything looks its best.
| Content Type | Recommended Aspect Ratio | File Format | Max Video Length |
|---|---|---|---|
| Feed Post (Photo) | 1:1, 4:5, 1.91:1 | JPG, PNG | N/A |
| Feed Post (Video) | 4:5 (Vertical) | MP4 | 60 seconds |
| Instagram Story | 9:16 (Full Screen) | MP4, JPG, PNG | 15 seconds (per slide) |
| Instagram Reel | 9:16 (Full Screen) | MP4 | 90 seconds |
| Carousel Post | 1:1, 4:5, 1.91:1 | JPG, PNG, MP4 | 60 seconds (per video) |
Keep these numbers in mind, and you’ll be well on your way to posting high-quality content directly from your computer, every single time.
So, you've got your desktop workflow all figured out, but suddenly an upload fails. It happens. A random error message pops up, or worse, the "Create" button just vanishes. It’s frustrating, but don't throw your keyboard just yet. The fix is almost always simpler than you think.
Most of the time, these little hiccups are just browser glitches or a shaky connection—not a major problem with your account.

Your first line of defense? A good old-fashioned browser spring cleaning. Clearing your cache and cookies is the digital equivalent of turning it off and on again. It gets rid of outdated data that might be causing a conflict with Instagram's latest code and solves a surprising number of unexplainable errors.
If that doesn’t do the trick, the browser itself might be the culprit. I've seen it countless times where a browser extension—usually an ad blocker—interferes with the scripts on a website, causing features to break or disappear entirely.
Before you get lost down a rabbit hole of complex solutions, run through this checklist. From my experience, one of these three simple actions solves the problem 90% of the time.
The whole point here is to isolate the problem. By quickly ruling out the simple stuff like your browser cache or a rogue extension, you can figure out what's really going on without wasting a bunch of time.
Nine times out of ten, these steps will have you back up and running, posting from your desktop like a pro.
Even with the best guides, some specific questions always seem to pop up. Here are the answers to the most common things people ask about posting to Instagram from their computer.
The short answer is no, not really.
While Meta Business Suite lets you schedule a basic Story, and the browser trick can sometimes get a simple photo up, you lose access to the entire creative toolkit. You can't add interactive elements like polls, quizzes, stickers, or any of that trending audio from a desktop. For the full, engaging Story experience, your phone is still king.
Honestly, it depends entirely on your workflow. There's no single "better" way.
If you’re working with high-quality, edited content that lives on your computer—like professional photos or polished videos—posting from your desktop is a game-changer. It's way more efficient and helps preserve that crisp quality.
But for spontaneous, in-the-moment content that relies on mobile-native features like Reels templates or AR filters, the mobile app is where you want to be. Most successful creators I know use a hybrid approach, switching between both.
A persistent myth is that the Instagram algorithm punishes desktop uploads. This is 100% false. The algorithm cares about engaging content, not the device you used to publish it. Focus on making great stuff, not on how you hit "post."
Nope, not at all. Hashtags function exactly the same whether you add them from your computer or your phone.
The real key is your hashtag strategy and relevance, not the device you’re using. In fact, using a tool like Meta Business Suite can make managing and pasting in your go-to hashtag sets much faster than pecking them out on a tiny phone screen.
Yes, you absolutely can! This is a huge feature for brands and creators.
When you're creating a post directly on instagram.com or through Meta Business Suite, the option to invite collaborators is right there, just like it is on the mobile app. This is a crucial tool for partnership campaigns and a great way to boost visibility, similar to how you’d tag products in Instagram Shopping ads to tag products to reach a much wider audience.
Ready to stop wasting time on manual ad uploads? Lix.so lets you launch entire Facebook Ad campaigns in seconds. Upload creatives in bulk, reuse winning campaign templates, and get back to focusing on strategy. Try it free and see how much time you can save at https://lix.so/en.
Create hundreds of Facebook Ads campaigns in minutes with Lix.so. Batch creative upload, reusable templates, and automatic campaign generation.
✓ Free for 14 days · ✓ No credit card required · ✓ Cancel anytime